Paint for Interior Doors
 The simplest way to increase the value of your home is by painting. Invest in a few cans of paint, and you can see a $2,001 increase in value or 107% return on investment.
Interior doors take quite a lot of abuse due to handling and can show signs of wear and tear. A new coat of paint to your doors can brighten the room and bring about a pleasant and bright look. But it is not as easy as that.
This article takes you through the entire process of painting your interior doors, the right paints, finishes, colors, trends, and much more.
Paint Finish for Interior Doors
Interior doors take a lot of use worse than any other surface of your home. As such, the sheen you choose should stand up to the years and not show it.
Semigloss is the best paint finish for interior doors and trim. The reason being, semi-gloss can take up quite an abuse and stand up to nicks and scrapes better than any other sheen, flat or eggshell finish.
The large surfaces gather dust just like your furniture. So, make sure that the paint is easier to clean and hold better with frequent cleaning.
The glossy sheen of the paint makes it easier for the architectural details of the trims and the doors to stand up against the relatively flat nature of the walls.
Best Paints for Interior Doors and Trim
Here are the best paints available for interior doors:
Diamond Brite Paint 31000 – Easy to apply with brush, roller, or even sprayer and 6-8 hours drying time.
Glidden Premium HDGWN52D – A budget-friendly version with the same quality as expensive paint
Rust-Oleum’s 7798502 – Rust and corrosion resistant; Perfect for all surfaces including wood, concrete, masonry, metal, etc.
KILZ 2 Multi-Surface – Dries in about 30 minutes and can be used over old doors before you repaint.
Can I Use the Same Paint for Doors and Trim?
Yes! You can use the same paint for doors and trim especially if it matches the walls. Interior designers apply this little trick for smaller rooms to make them look spacious. However, if you’d like some contrast, paint the trim a shade darker than the door.
Contrastingly, you can also go with different shades for your trim and door. In that case, make sure that your door is of the appropriate color and finish since you’d be drawing attention towards it.
What’s Better: Satin Paint Finish vs. Semi-Gloss Paint Finish
While both the paint finishes have been used on doors, the semi-gloss finish seems to hold up better concerning cleaning and lifespan. The gloss gives a subtle shine, breaking the flatness and monotony of the walls.
Though the former also has a shine and easy to clean, they are not as much as the semi-gloss paint finish.
Interior Doors: Semi-Gloss Finish vs. High Gloss Finish
Interior doors take quite a lot of use and hence need paint that offers resilience. High gloss paint is the most hard-wearing paint of all, tough and washable too. They are the easiest to clean, with semi-gloss coming a close second.
However, on the downside, its reflective nature highlights all the flaws on the surface.
On the other hand, a semi-gloss finish has properties similar to the high gloss finish but is not as reflective and a little forgiving. If your doors have dings and dents, or even otherwise, a semi-gloss finish is the better option.
Upon comparing both the paint finishes, semi-gloss looks to be the perfect finish for interior doors.
What’s Better: Latex Paint vs. Oil Based Paint
Latex paints are easier paints to work with and perfect for indoor use due to the low VOC content. Even though they dry pretty fast, they are not nearly as long-lasting and not particularly durable as well. This makes latex paint ideal for use on walls, ceilings, etc., but not on doors or furniture.
Oil-based paints, on the other hand, works well on wood. So, they are best used on doors and trims. Though they dry slow and need at least 8 hours between coats, they are long-lasting. On the downside, they may have high VOC content, which makes it inappropriate for use indoors.
However, to circumvent this problem, you need to get oil-based paint particularly formulated for indoor use.
On comparing both for doors and woodwork, oil-based paints win hands down.
How to Paint Interior Doors
Ensure that you do the following things before painting interior doors:
- You remove all the door hardware, like doorknobs.
- Cover the hinges with painter’s tape.
- Paint in a well-ventilated area.
- Before the paint job, clean with a degreasing cleaner.
- Fill the holes and repair imperfections.
- Lightly sand with 120-grit sandpaper to remove the previous paint job.
- Clean and dust the area.
- Put down a rag to catch the drips.
- A brush may be more effective for panel doors.
Most doors are heavy and difficult to remove and carry. The easiest way to paint a door is while it is this still attached. Follow the below method when painting a panel door:
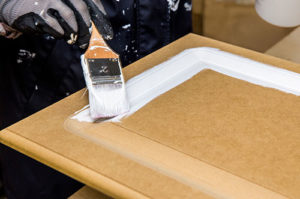
- Start by painting the inside of the top panels. Coat the recessed areas first and then move to the faces.
- Paint the vertical stiles and then the center stiles. Finally, blend in the brush strokes.
- Continue with painting the rails, starting with the top rail and working towards the bottom.
- Paint the edge at the last while making sure you do not get any runs when painting the face of the door.
- Once the paint is dry, do another coat for a uniform appearance.
Professional Tip: You tend to get better results if you paint the door unattached.
Painting an Unattached Door
Painting an unattached door is easy, particularly if you are a beginner. It prevents drips and runs, especially when painting the edge.
 Remove the door from its hinges and place it on a sawhorse.
- Coat the edge first and then move onto the panels.
- When painting the face of the door, start with the recessed areas, continue onto the horizontal rails. And finish with the vertical stiles.
- Let the paint dry completely, and then flip it over to paint the opposite side.
Which Is Better to Paint Doors: Brush or Roller?
Both brush and roller have their advantages when it comes to painting doors.
A roller is obviously the better option for flat doors since it goes smooth, leaving minimum stippling behind. On the other hand, for a panel door, reach for a brush. Or you can use a combination of both.
Use the roller for the center and an angled brush for the sides recessed areas. Finally, use a brush to smooth out the roller stipple. This results in a smooth and uniform look.
However, a brush gives a hand-painted finish.
How to Paint a Door without Brush Marks
The most important thing about painting without brush marks is to sand in-between each coat. It removes the brush strokes from the previous coat and allows the next one to go smooth.
Do not go hard; just gentle scuffing to make it a little smoother. Remember, you can always touch up the spots. Load the tip of the brush with a little paint and dab the area lightly.
When painting, holds your brush at an angle and straight. Another tip from the painters is to dip the brush in water first and then the paint.
Paint the Interior Door in Two Different Colors
Painting the door in two colors is something of a trend right now. Here are some fool-proof tip or two to help you rock the dual-tone trend:
- Paint the edge that opens the same shade as the side that opens into the room.
- Paint the edge on the side of the hinges to be the same shade as the other side of the door.
Tips for Painting Interior Doors
Everything from the color selection to the tools and your painting technique impacts the final finish of the door. Here are some professional painting tips from painters to get a smooth and beautiful door.
- Ascertain the old paint type to help determine the use of a primer.
- Consider sunny and outlandish colors to give a visual shake-up.
- If your door is white or another light neutral, paint both the door and the trim in the same shade.
- If your door is of a darker shade, go for an off-white or neutral trim.
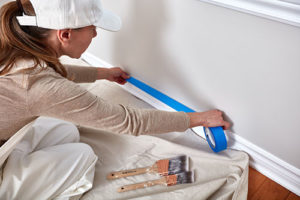
- Paint your trim first and let them dry for 24 hours. Apply masking tape and protect the trim first before painting.
- Prep the surface by filling in the cracks with a wood filler and a putty knife.
- Finish the paint job in one sitting
Note: Determine the presence of lead. Lead, if absorbed by the body, leads to organ damage and brain damage. Call the National Lead Information Hotline at 1-800-424-LEAD, and they can safely remove the lead.
Paint Colors for Interior Doors
Painting interior doors haven’t been a trend for long. The color of your interior door depends on how much focus you want on the door. If you do not wish to call attention to the door, pick white.
But if you are painting the interior door a different hue, choose from your decor. That way, you have a cohesive feel to your home.
The choice of color of your interior door depends on the theme you have going indoors.
- Black
- Aqua blue
- Deep blue
- Grey
are the most common colors. Nevertheless, ensure that you carry the theme to your furnishings and make the flow look seamless.
Can I Paint the Door Frame the Same Color as the Interior Doors?
While that’s the case generally, your door frame and door need not match. The color of both areas depends on your personal taste and the look you have got going inside your home.
You can have the door frame match your wall and have a different door making it the focus of attention. Or you could have it different from the wall and the door. In that case, it should be neutral, like white.
Tips to Choose Interior Door Color
 Interior doors need not feature architecture to make a style statement. Here are some tips for painting interior doors for a trendy and classy look:
- For a sleek and seamless look, paint the walls, trim, and door in the same color.
- For a dual-color door, paint the edge depending on how the door opens and how long it stays open.
- Neutral tones such as black, white, tan, taupe, beige, and grey go with both light and dark walls.
- For a door with brilliant architectural details, paint in a subtle two shades darker or lighter than the room.
- For wallpapered rooms, choose a dark color from the paper for the door and the lightest shade for the trim.
Conclusion
Interior doors have never garnered much attention as it has in the last five years. While before it was a classic white to match the walls, it moved to neutrals and even bright and sunny hues.
However, it is not just about the shade but also about the finish. The much-preferred paint finishes are high gloss and semi-gloss. Since high gloss highlights every fault and flaw, semi-gloss wins hands down.
The tools of the trade also impact the look and feel of the door. Even an experienced and skilled painter cannot match the perfection of spray paint, making it the best option. However, it is not ideal to spray-paint a door when it is still attached. Considering all these, the better option is the brush for a panel door and roller for the flat door.
Pamblanco Painting Contractors is a family-owned and operated residential and commercial painting business and has been providing painting services since 1993. Get your free quote today!

 Painting your homes with the help of the right painters is one of the best ways to revamp the look of your abode. It is undeniably the best way to give your home an extraordinary appearance and add colorful effects to it.
  Another major cost determinant is the amount of preparation work that needs to be done. Painters will always make sure that preparations are taken into consideration while estimating the cost.
 People Also Ask
 Drywall must be primed before it can be painted to ensure that the paint stays on and isn’t affected by temperature changes in the room or environment. To prime your drywall, you need to clean it first by sanding it, vacuuming it, and rubbing it down with a black cloth to ensure that all dust is gone. Once that’s complete, you can begin applying primer to your drywall so that you can ensure that your paint stays in place for a long time.